
Deploying NVIDIA NIM Microservice in a Private Environment
This guide explains how to securely and efficiently deploy LLM models like llama-3.2-3b-instruct in a private environment using NVIDIA NIM Microservice on PAASUP DIP. It supports both Python code integration and no-code workflows with Flowise, ideal for diverse enterprise AI applications.
Introduction
With the rapid expansion of AI model usage, safely and efficiently deploying and operating AI models in enterprise environments has become a critical challenge. NVIDIA NIM (NVIDIA Inference Microservice) is a container-based microservice designed to meet these requirements.
In this post, we'll introduce step-by-step process of building and running the llama-3.2-3b-instruct model in a private environment using the NVIDIA NIM catalog of PAASUP DIP (Data Intelligence Platform).
Table of Contents
What is NVIDIA NIM?
NVIDIA NIM is a container-based microservice proxy optimized for NVIDIA GPUs, designed to simplify the AI inference process and maximize performance. It standardizes complex AI model deployment processes, helping developers build AI services more easily.
Deployment Process
Step 1: Copy NIM Microservice Container Image Pull Path
First, you need to download the container image for the required model from the NVIDIA NGC catalog.
Access NGC Catalog and Select Model
- Visit https://catalog.ngc.nvidia.com
- Click on Containers menu
- Check the NVIDIA NIM filter to display only NIM-related containers
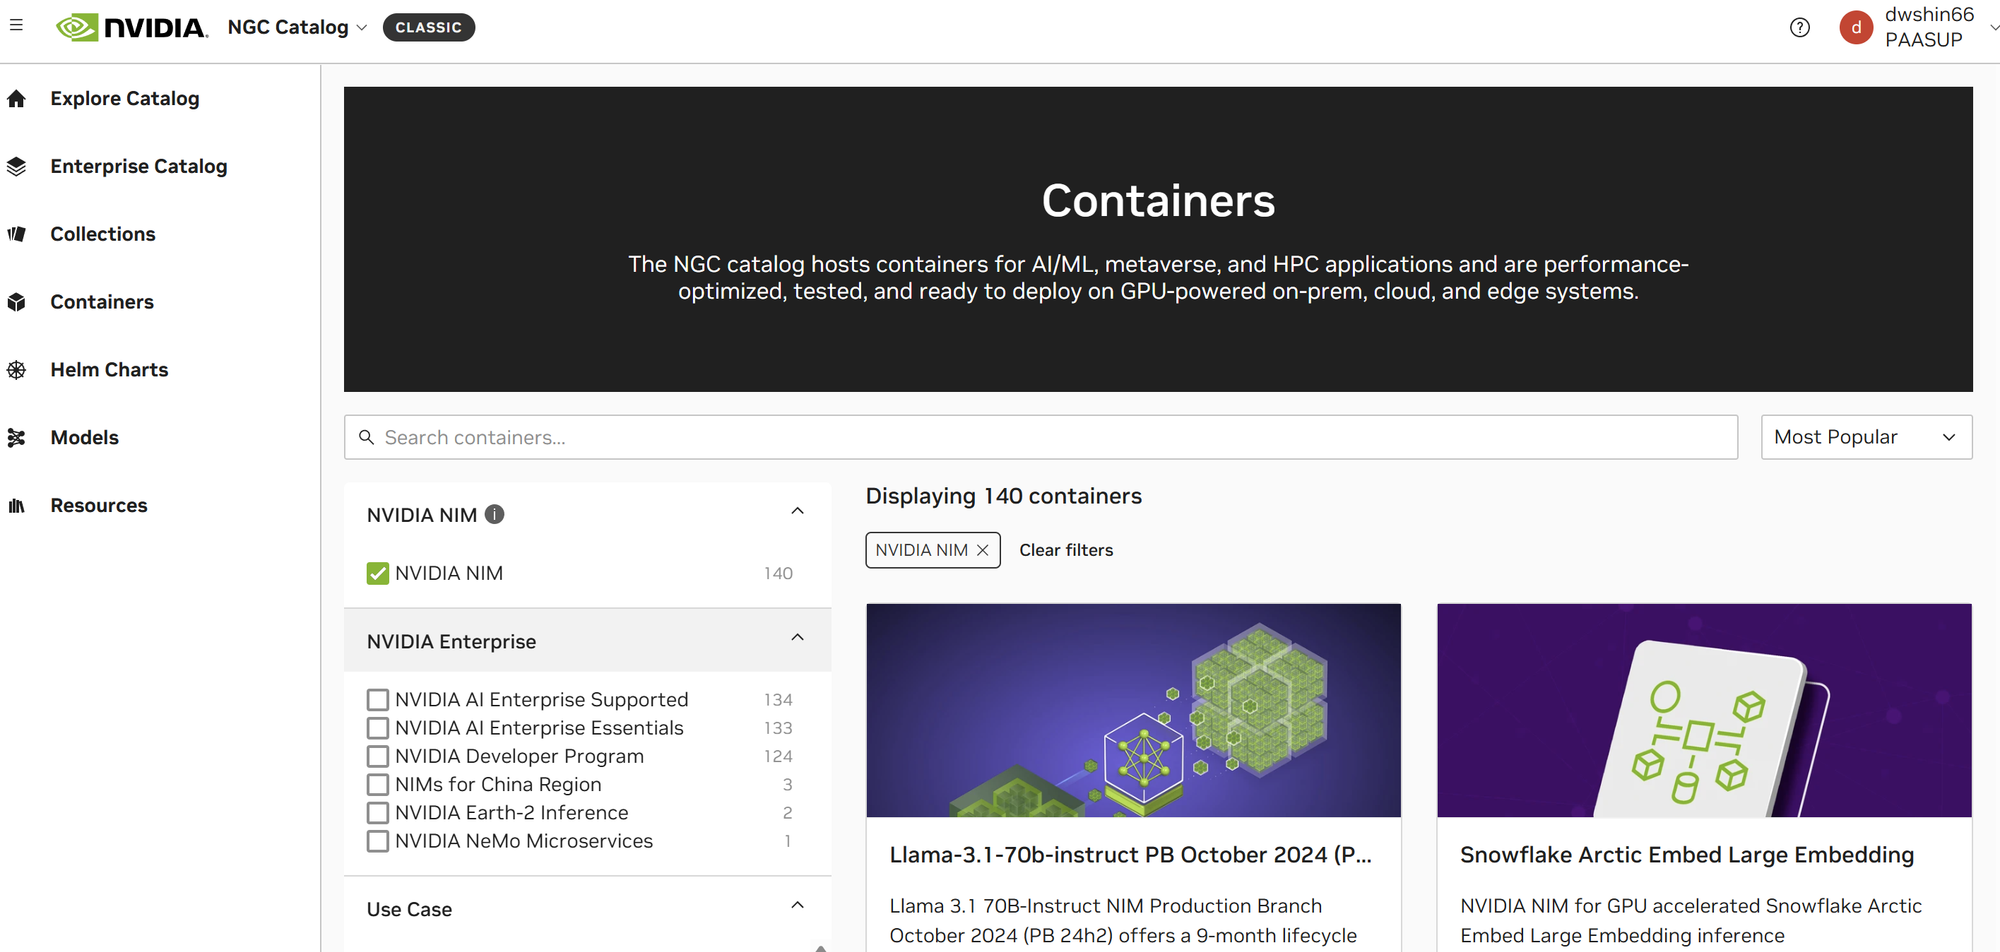
- Search and select the desired model (here
llama-3.2-3b-instruct)
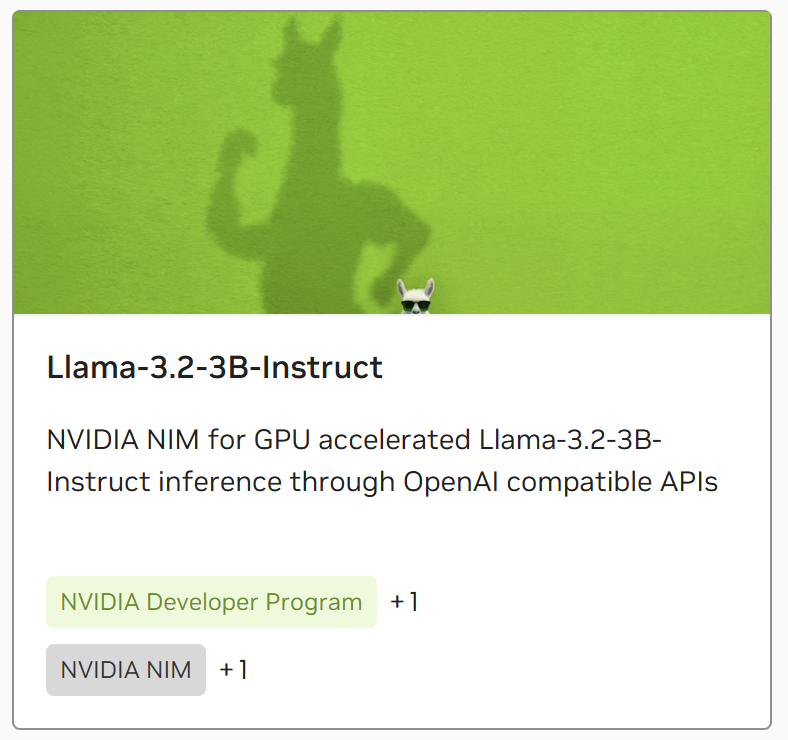
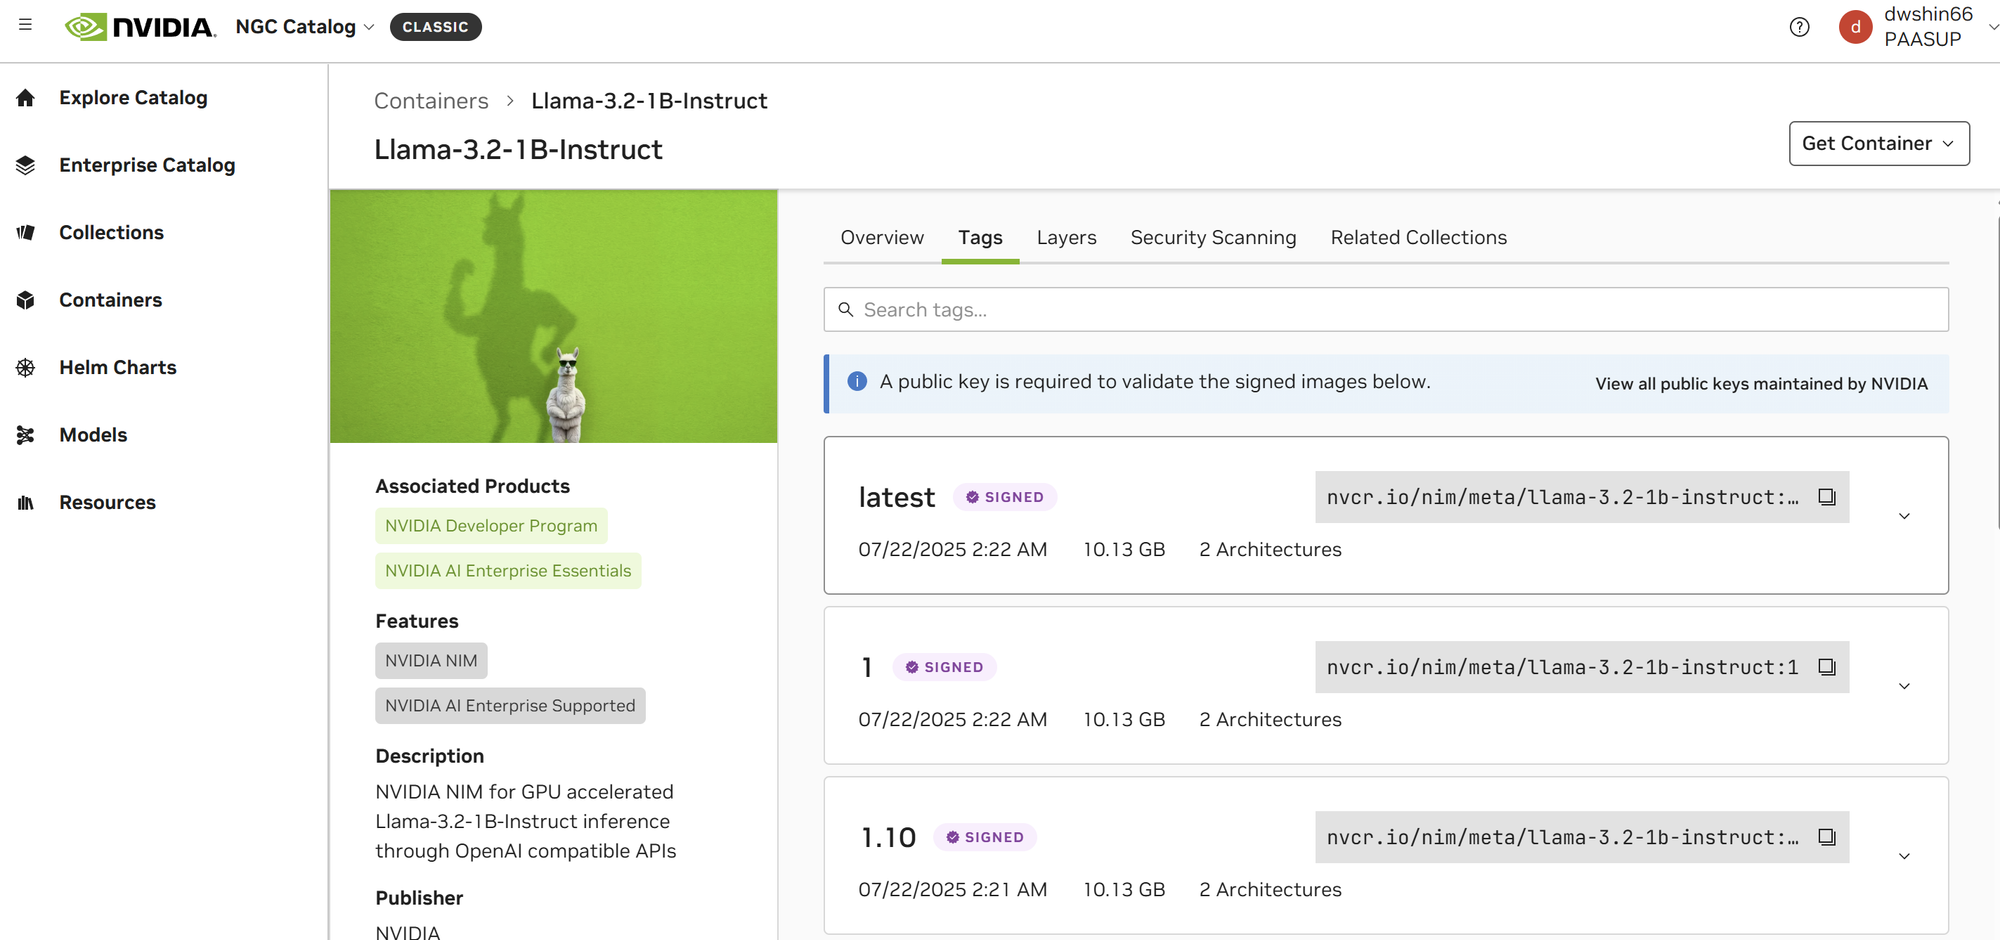
- Navigate to the Tags tab in the model card and copy the container image pull path
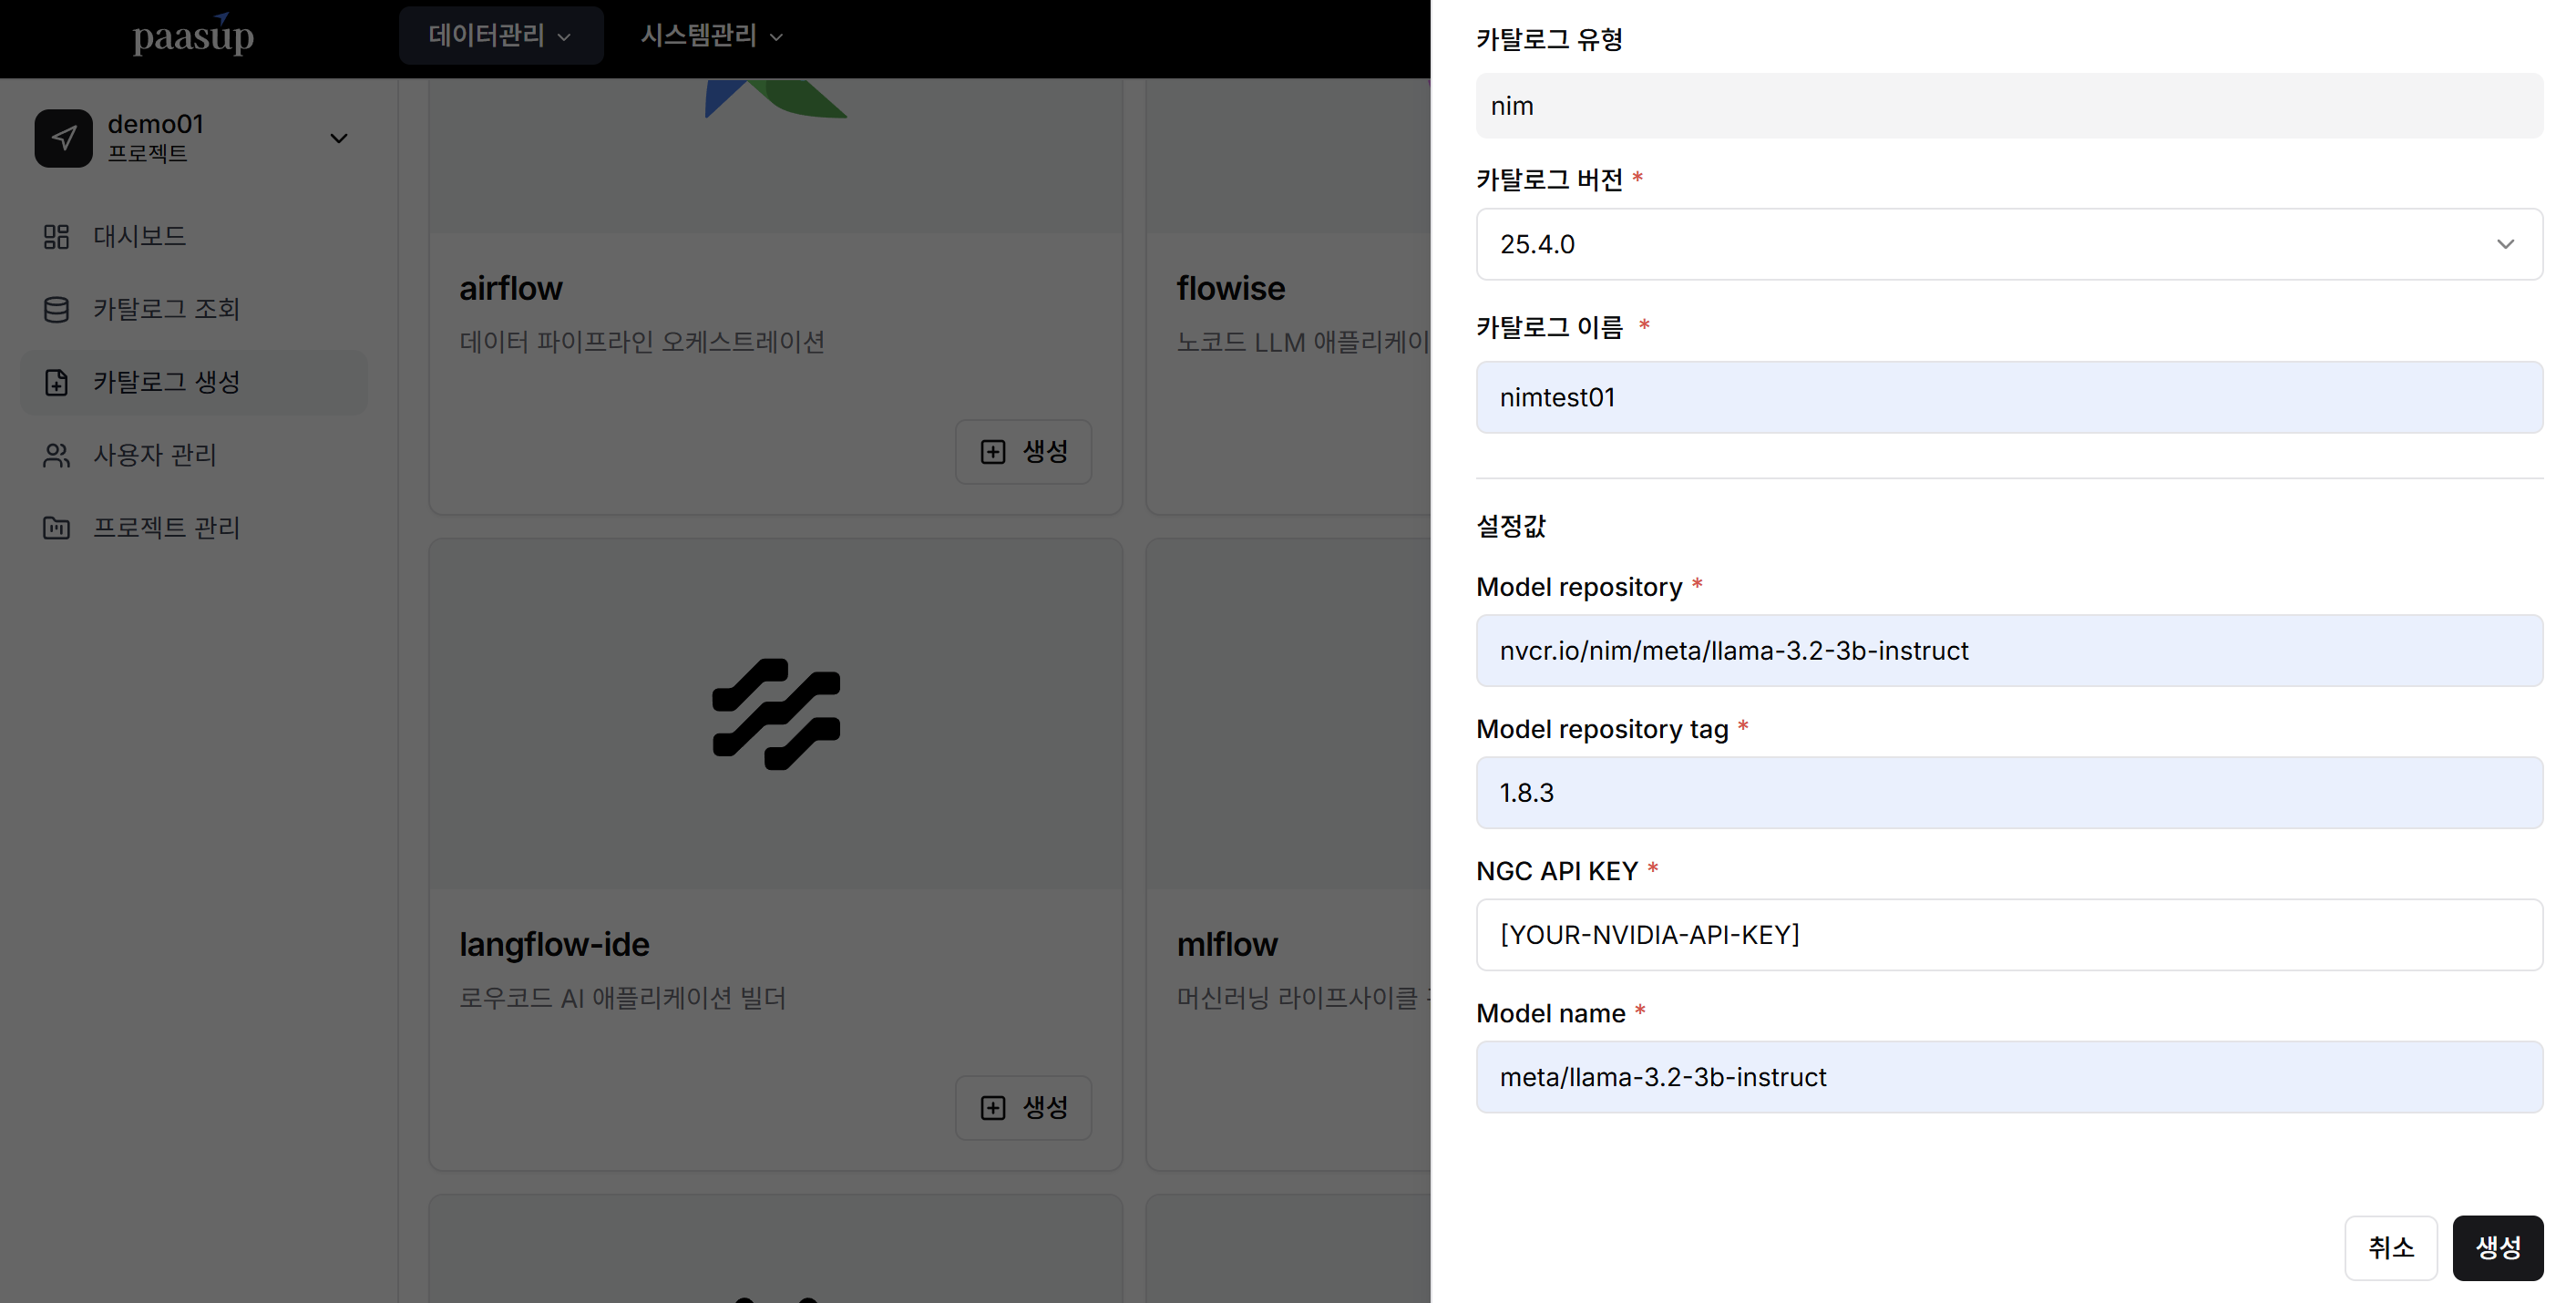
Step 2: Create NIM Catalog in PAASUP DIP
Configure a catalog to create NIM service in the DIP environment.
Basic Configuration
- Catalog Version: Enter desired version
- Catalog Name: Enter an identifiable name
Service Model Configuration
CASE 1: When the catalog deployment environment is connected to the internet
Configure with the container image pull path of the model to be served copied from Step 1:
- Model repository:
nvcr.io/nim/meta/llama-3.2-3b-instruct(Pull path excluding version) - Model repository tag:
1.8.3(Version information of the model from pull path) - NGC API KEY: Enter NVIDIA API key
- Model name:
meta/llama-3.2-3b-instruct(Model name from pull path)
CASE 2: When the catalog deployment environment is not connected to the internet
Download the container image in an internet-connected environment, then import it into the DIP environment before deploying the catalog:
- Model repository:
nvcr.io/nim/meta/llama-3.2-3b-instruct - Model repository tag:
1.8.3 - NGC API KEY: Enter any key as this is unused
- Model name:
meta/llama-3.2-3b-instruct
Click the Create button to create the catalog after completing the configuration.
Step 3: Call NIM Microservice from Jupyter Lab
Now you can call and use the created NIM service with Python code.
Access Jupyter Lab
- Click Kubeflow link in PAASUP DIP portal
- Select Notebooks in Kubeflow
- Access Jupyter Labs

Write and Execute Python Code
When writing Python code, enter the NIM catalog's domain information in base_url, and api_key is not used in private environments but is a required input parameter for OpenAI functions.
import httpx
from openai import OpenAI
# --- Client Setup ---
# Configure NIM microservice endpoint
client = OpenAI(
base_url = "http://demo01-nimtest01.demo01-nimtest01.svc.cluster.local:8000/v1",
api_key = "[YOUR-API-KEY]" # Not actually used in private environment
)
# --- Conversation History ---
messages = [
{"role": "system", "content": "You are a helpful assistant."}
]
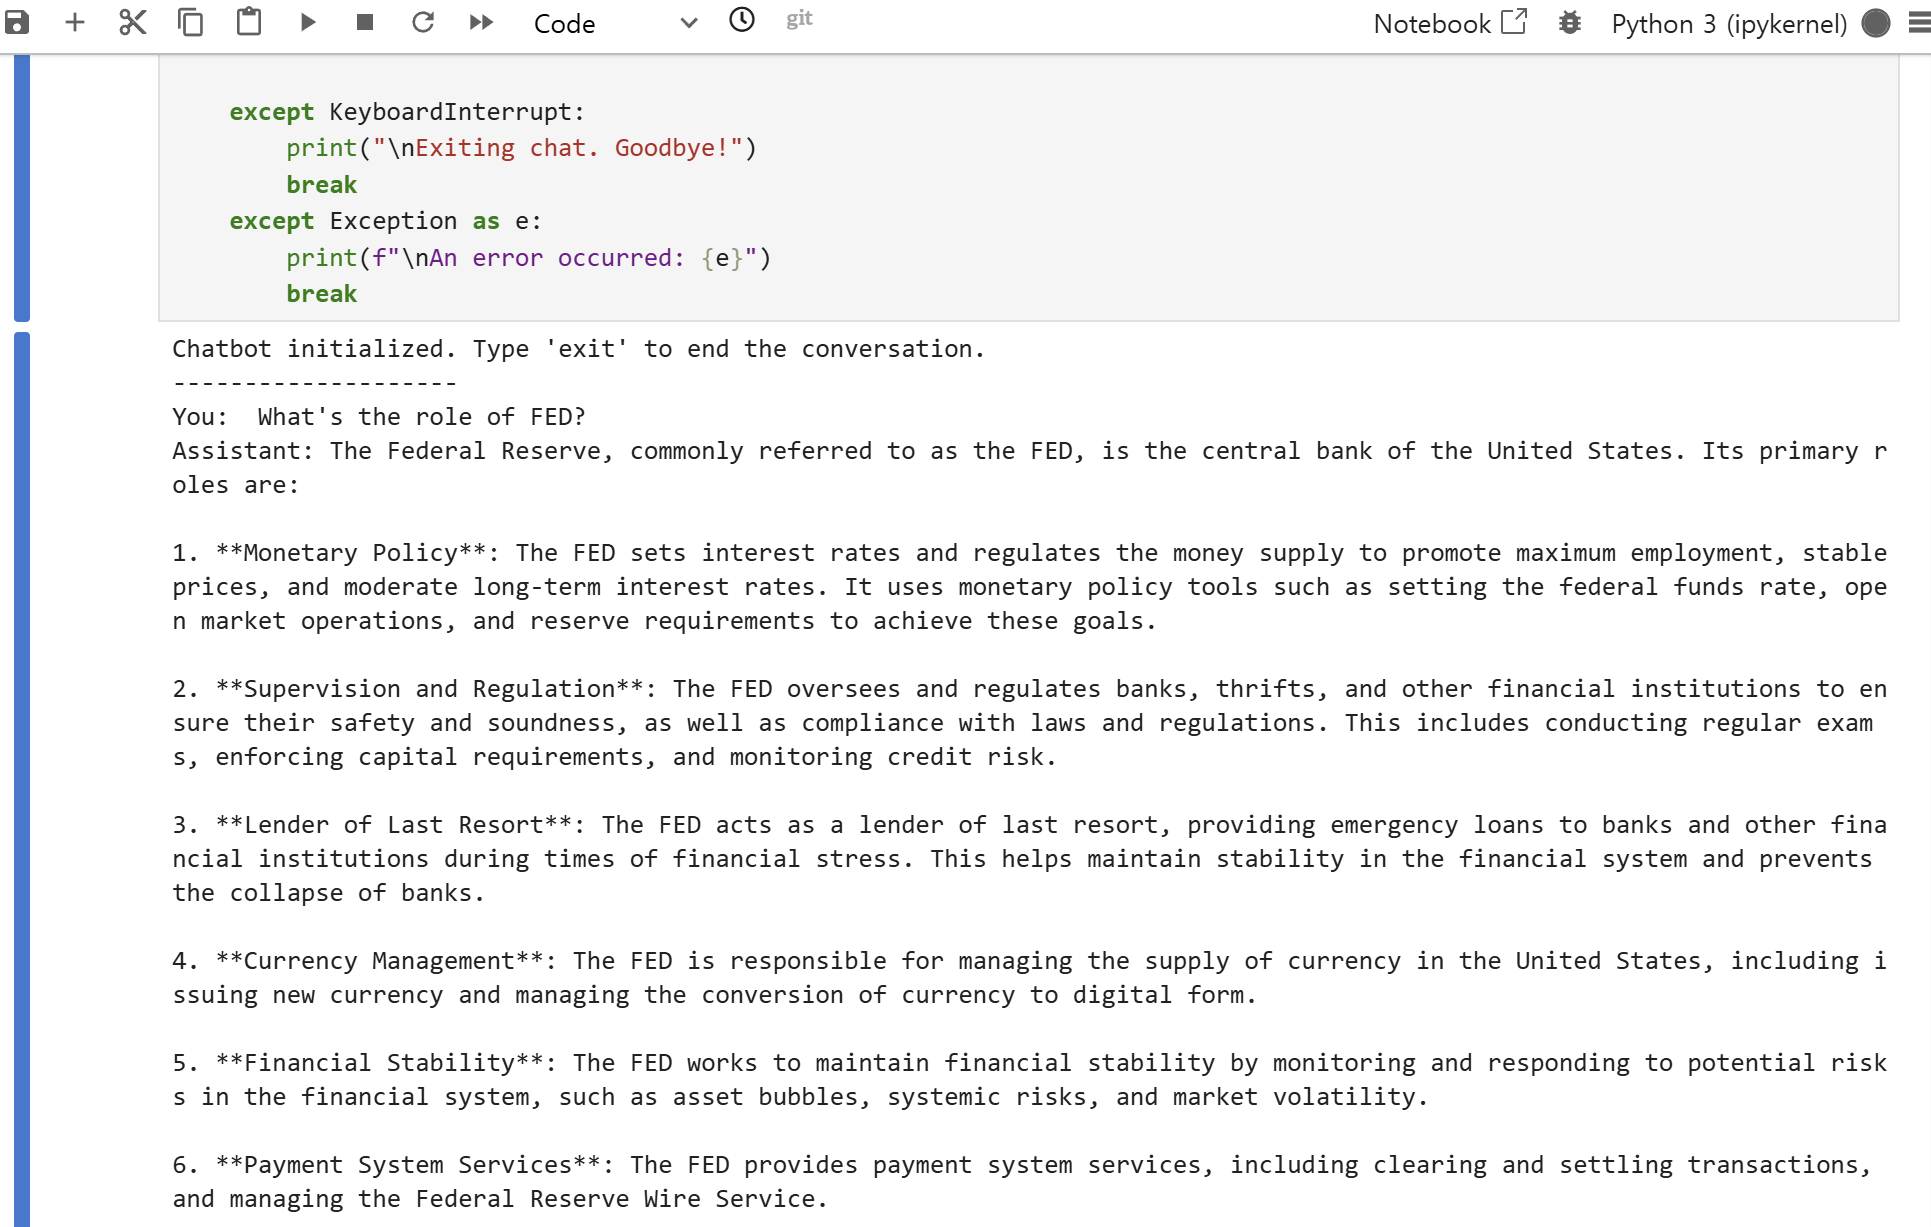
print("Chatbot initialized. Type 'exit' to end the conversation.")
print("-" * 20)
# --- Main Chat Loop ---
while True:
try:
# 1. Get user input
user_input = input("You: ")
# 2. Check for exit command
if user_input.lower() in ["exit", "quit"]:
print("Exiting chat. Goodbye!")
break
# 3. Add user message to conversation history
messages.append({"role": "user", "content": user_input})
# 4. Send entire conversation history to model
completion = client.chat.completions.create(
model="meta/llama-3.2-3b-instruct",
messages=messages,
temperature=0.5,
top_p=1,
max_tokens=1024,
stream=True
)
# 5. Stream model response output
print("Assistant: ", end="")
assistant_response = ""
for chunk in completion:
if chunk.choices[0].delta.content is not None:
content = chunk.choices[0].delta.content
print(content, end="", flush=True)
assistant_response += content
# 6. Add model response to history
messages.append({"role": "assistant", "content": assistant_response})
print() # Line break for clean formatting
except KeyboardInterrupt:
print("\nExiting chat. Goodbye!")
break
except Exception as e:
print(f"\nAn error occurred: {e}")
break
Execute the above code to start chatting:
Step 4: Call NIM Microservice from Flowise
To visually configure AI flows without writing code, you can utilize Flowise.
What is Flowise?
Flowise is a no-code based tool that helps quickly build chatbots and AI agents by visually configuring LangChain flows.
Flowise is provided as a catalog in PAASUP DIP.
Flowise Configuration Process
-
Click Flowise link in DIP Catalog
-
Select Chatflows > + Add New
-
Configure ChatLocalAI Component:
- Base Path: Enter NIM catalog's domain information
- Model Name: Enter model name to use
-
Add Buffer Memory Component and Conversation Chain Component
-
Connect each component to Conversation Chain
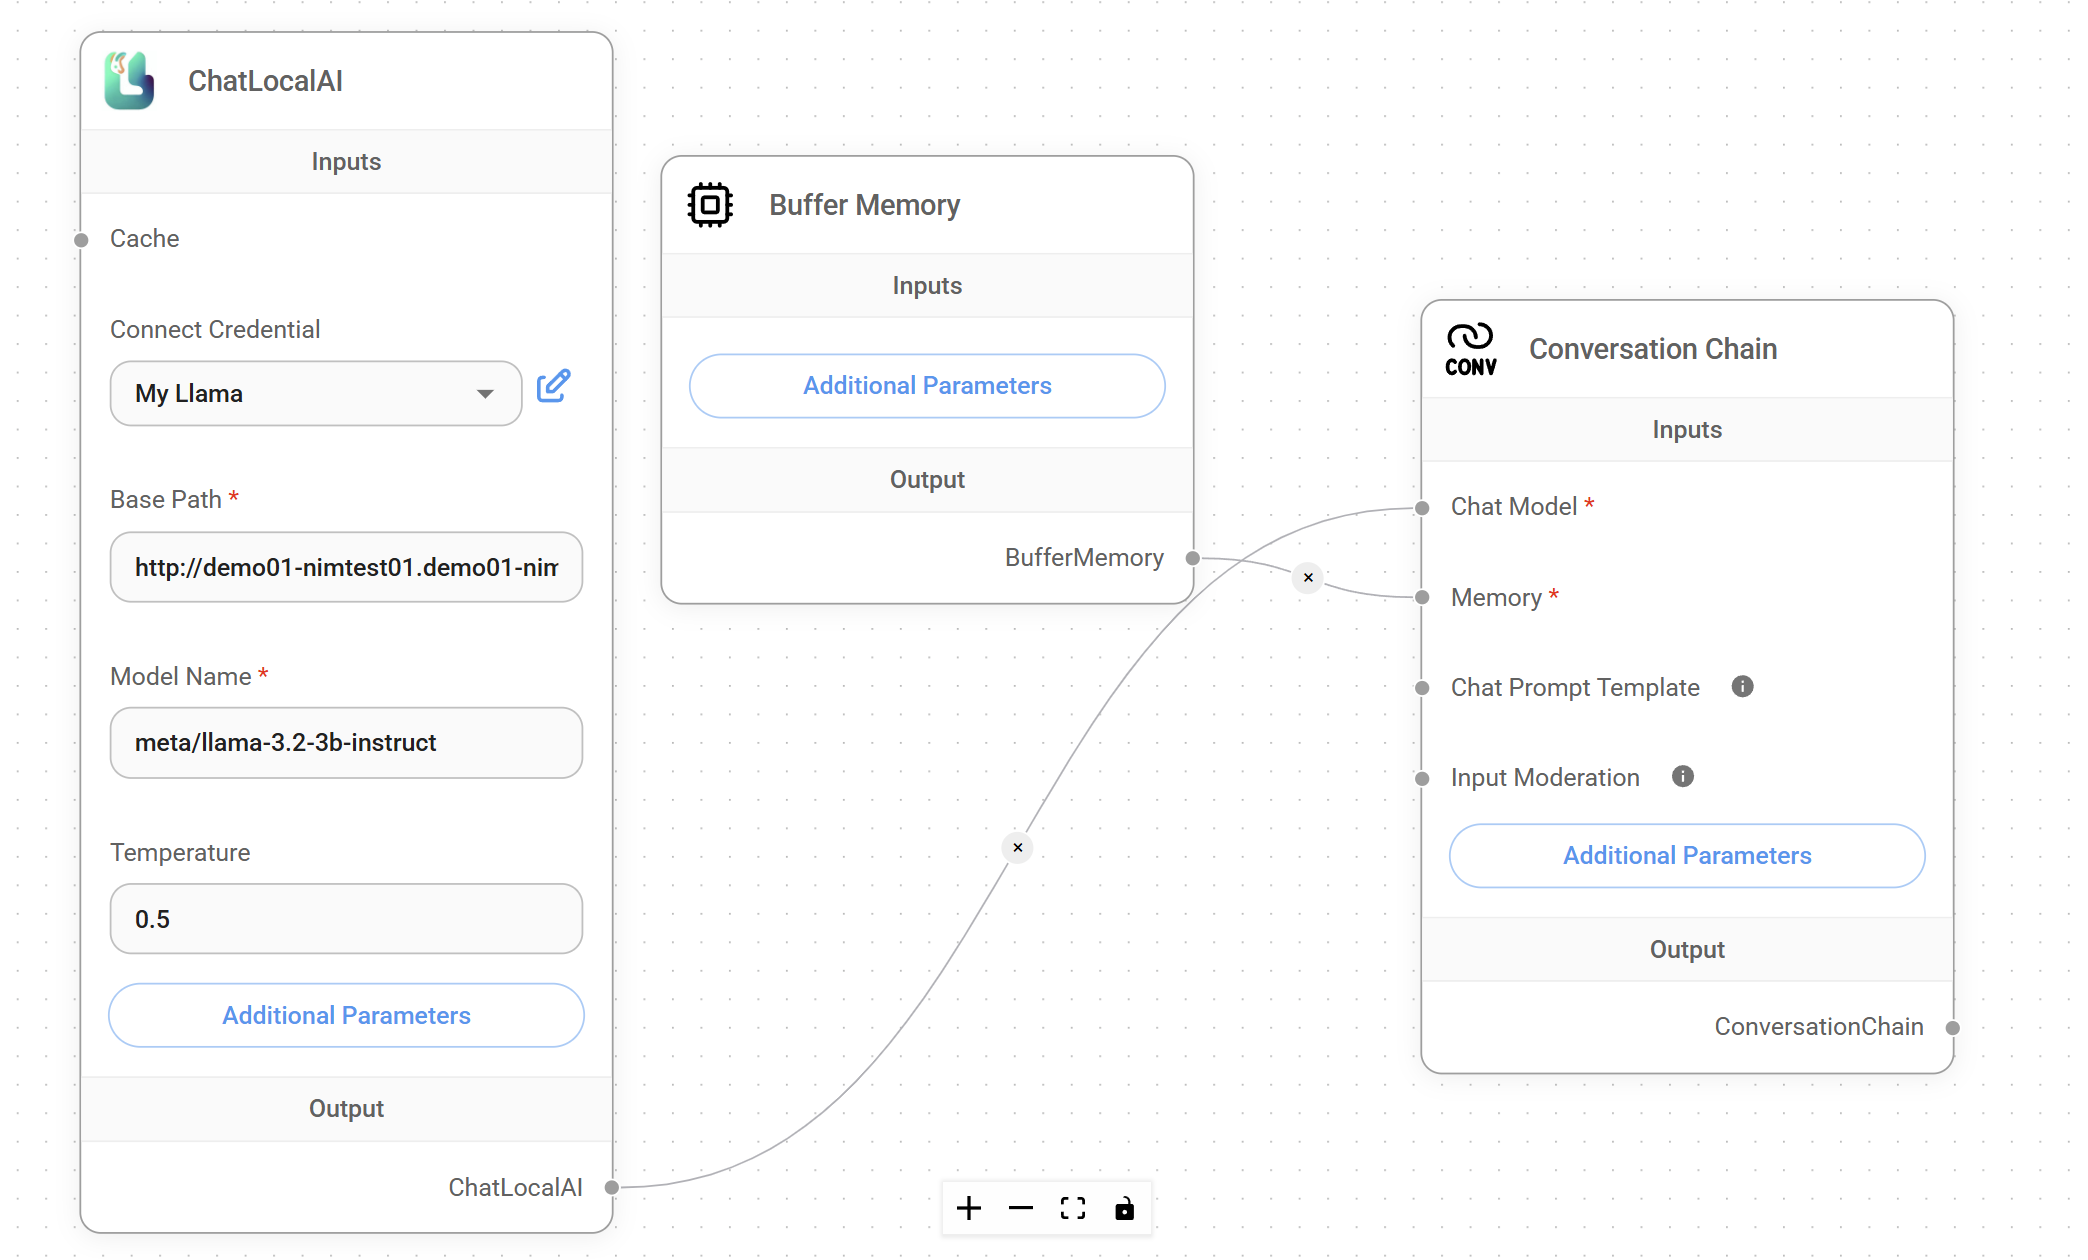
-
Save and click chat icon to start chatting

Key Advantages
1. Security in Private Environment
- Operates completely isolated within internal environment without depending on external APIs
- No risk of sensitive data leakage to external sources
2. Performance Optimization
- Provides high inference performance with optimizations specialized for NVIDIA GPUs
- Ensures consistent performance and stability through container-based approach
3. Development Convenience
- Enables reuse of existing code with OpenAI API-compatible interface
- Rapid prototyping through no-code tools like Flowise
4. Scalability
- Supports automatic scaling in Kubernetes environment
- Flexible system configuration with microservice architecture
Conclusion
Through the process of building NVIDIA NIM Microservice in the PAASUP DIP environment, we confirmed that the latest AI models can be safely and efficiently utilized even in private environments.
In particular, by presenting two approaches - direct API calls through Python code and no-code utilization through Flowise - we provide flexibility to meet various user requirements.
As AI technology continues to advance and security requirements strengthen, such private AI deployment methods are expected to become essential technologies in enterprise environments. We encourage you to build AI services that satisfy both security and performance using optimized solutions like NVIDIA NIM.