
Mastering NVIDIA DGX Spark: From Local Connectivity to Serving 120B Models
Unlock your NVIDIA DGX Spark's full potential. Build a Private AI Cloud using NVIDIA Sync, Tailscale, and Docker scripts to deploy Ollama, ComfyUI, and TensorRT-LLM with one click.

Table of Contents
- Introduction: Unlocking the Full Potential of High-Performance Gear
- NVIDIA Sync: Hassle-Free Local Connectivity
- Tailscale: Secure Network Access from Anywhere
- OpenWebUI: Building Your Own Private Chatbot
- ComfyUI: Automating Stable Diffusion Image Generation
- TensorRT-LLM: Enterprise-Grade LLM Serving
- Conclusion: Completing Your Private AI Cloud
Note: This guide is based on the official NVIDIA DGX Spark Playbook and includes additional configurations (Tailscale, Custom Scripts) to enhance usability in real-world operating environments.
1. Introduction: Unlocking the Full Potential of High-Performance Gear
Even with a workstation equipped with powerful GPUs, usability suffers if you have to open a terminal and type long Docker commands every time. Additionally, the need to securely access this equipment from outside the office is inevitable.
To solve this, we combine three tools:
- NVIDIA Sync: Automatic device discovery and status monitoring within the local network.
- Tailscale: A Mesh VPN that allows external access without complex port forwarding.
- Docker & Custom Scripts: Reducing complex execution processes to a single button press.
Let's transform this powerful hardware into a true "Personal AI Cloud."
2. NVIDIA Sync: Hassle-Free Local Connectivity
After setting up the DGX Spark, the first step is to connect your PC to the equipment. Instead of scanning for IPs manually, use the dedicated tool provided by NVIDIA.
1) Installation and Device Discovery
NVIDIA Sync uses mDNS (Multicast DNS) to automatically find devices on the same network subnet.
- Download: Install the version appropriate for your OS from NVIDIA Spark - Connect to your Spark.
- Add Device: Ensure your PC and the Spark unit are on the same network (Wi-Fi/Router), then launch the app.
Hostname or IP: The device's hostname or IP address.Username / Password: The account credentials set during initial setup.
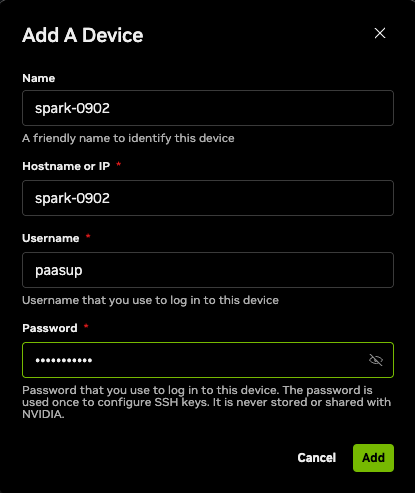
- Connect: Select the registered device and click the
Connectbutton.
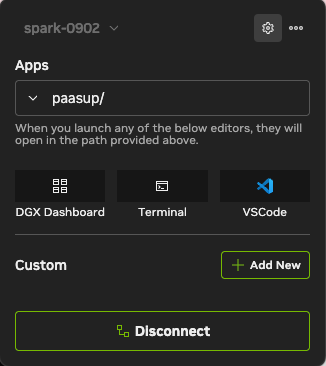
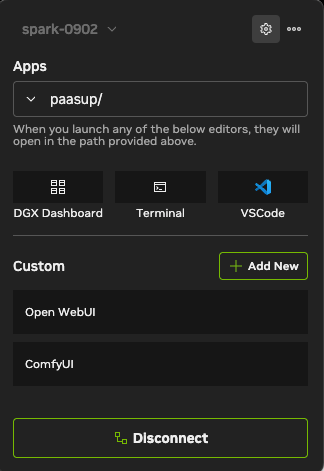
2) Using the Dashboard
Once connected, you can immediately use core features from the dashboard, such as CPU/GPU resource monitoring, accessing JupyterLab, and launching the terminal. We will use the 'Custom' menu here to manage the AI services we configure in later steps.
3. Tailscale: Secure Network Access from Anywhere
Local connection is established, but we want access from outside the office. Tailscale is the optimal solution, creating a secure private network without complex firewall settings or port forwarding.
1) Installing Tailscale on DGX Spark (Host)
Connect via the built-in terminal or SSH and run the following commands:
# Update package list and install prerequisites
sudo apt update && sudo apt install -y curl gnupg

# Add Tailscale GPG key
curl -fsSL https://pkgs.tailscale.com/stable/ubuntu/noble.noarmor.gpg | \
  sudo tee /usr/share/keyrings/tailscale-archive-keyring.gpg > /dev/null

# Add Tailscale repository
curl -fsSL https://pkgs.tailscale.com/stable/ubuntu/noble.tailscale-keyring.list | \
  sudo tee /etc/apt/sources.list.d/tailscale.list

# Install and start Tailscale
sudo apt update && sudo apt install -y tailscale
sudo tailscale up
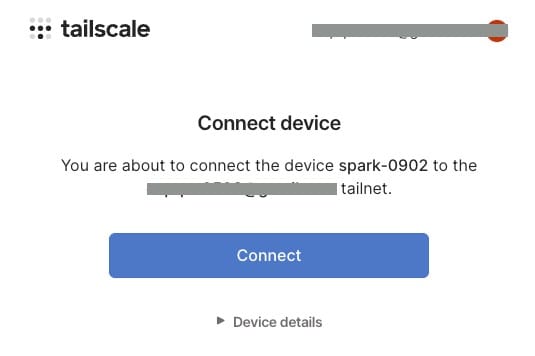
When sudo tailscale up is executed, an authentication URL will appear. Open it in your browser to log in.
Tip: While business email accounts offer trial versions, using a personal Gmail account is recommended for long-term personal use.
Once logged in, click Connect to register the DGX Spark as a member of your secure private network (Tailnet).
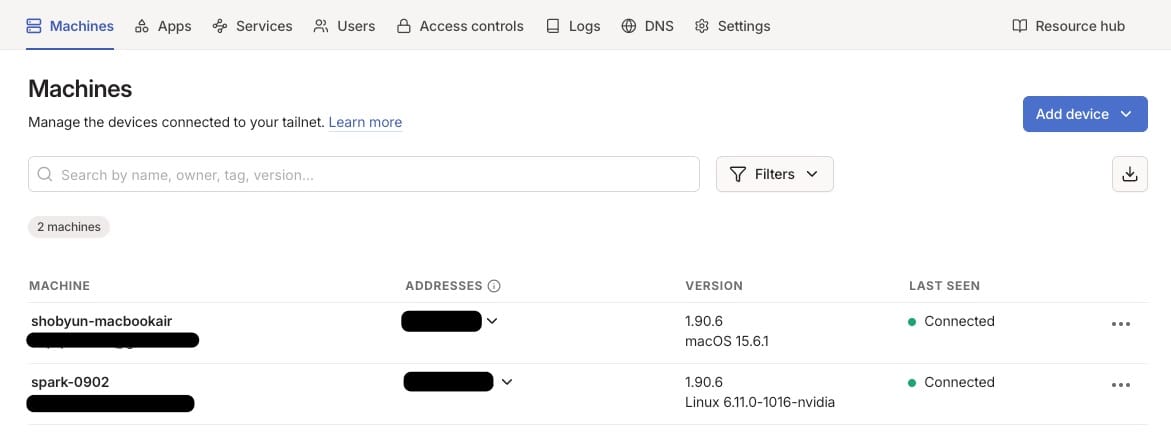
Note: Upon starting Tailscale, a private tailnet is created, and a fixed IP address in the 100.x.x.x range is assigned.
2) Setting up Client Devices (Your PC/Mac)
You must also install Tailscale on the computer (Client) you wish to connect from and log in with the same account.
- macOS: App Store or Official Download
- Windows: Official Download
- Linux: Same as the Spark installation method above.
After installation, launch the app and log in with the same credentials used on the Spark.
3) Registering Remote IP in NVIDIA Sync
The connection loop is complete. Now, configure NVIDIA Sync to point to the Tailscale IP instead of the local IP.
- Type
tailscale ipin the DGX Spark terminal to find the IP starting with100.x.x.x(also visible on the Tailscale admin console). - In NVIDIA Sync settings (Settings > Devices), modify the existing connection or add a new one.
- Enter the Tailscale IP in the Hostname or IP field.
Now, whether you are at home or in a cafe, as long as you have internet, you can control the powerful performance of DGX Spark via NVIDIA Sync.
4. OpenWebUI: Building Your Own Private Chatbot
With connectivity established, let's run the first workload. Ollama is the easiest way to run local LLMs, and OpenWebUI provides a clean user interface similar to ChatGPT.
1) Manual Installation and Verification (CLI)
First, verify that the container runs correctly in the terminal environment.
Docker Permission Configuration
Add your user to the docker group to run commands without sudo.
sudo usermod -aG docker $USER
newgrp docker

# Verify permissions (Success if a list appears without errors)
docker ps
Download Image and Test Run
Pull the Open WebUI image bundled with the Ollama backend.
docker pull ghcr.io/open-webui/open-webui:ollama
Run it opening port 8080 and utilizing all GPUs.
docker run -d -p 8080:8080 --gpus=all \
  -v open-webui:/app/backend/data \
  -v open-webui-ollama:/root/.ollama \
  --name open-webui ghcr.io/open-webui/open-webui:ollama
Access http://<DGX_SPARK_IP>:8080 in your browser.
Note: Data is stored in Docker volumes (
open-webui,open-webui-ollama), so chat history and models persist even if the container is deleted.
Initial Setup and Model Download
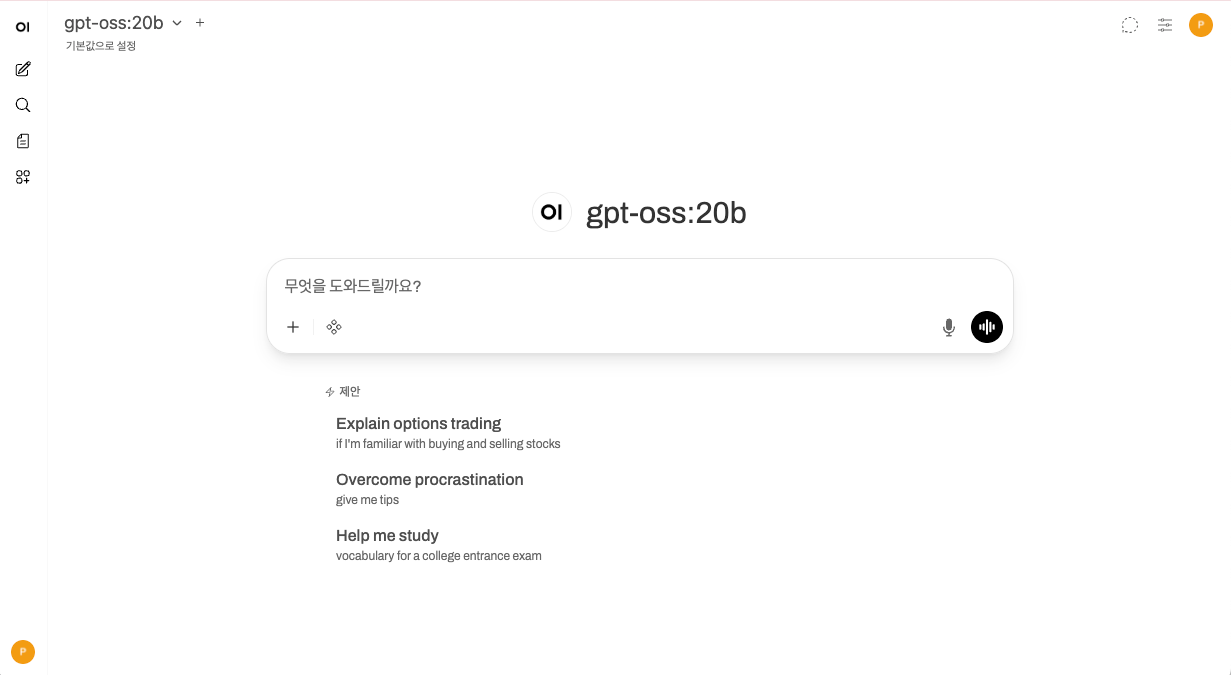
- Create Admin Account: On first access, create an account with your name, email, and password.
- Download Model:
- After logging in, click the "Select Model" dropdown in the top left.
- Search for
gpt-oss:20b(orllama3,mistral, etc.). - Click "Pull '...' from Ollama.com" to start downloading.
- Test: Select the model and enter a message to confirm it responds.
Cleanup and Rollback (Important)
Manual testing is complete. Stop the running container to configure it for NVIDIA Sync in the next step. (Skipping this may cause port conflicts).
# Stop and remove container
docker stop open-webui
docker rm open-webui

# (Optional) To delete the downloaded image
# docker rmi ghcr.io/open-webui/open-webui:ollama

# (Warning) To delete chat history and downloaded models, run:
# docker volume rm open-webui open-webui-ollama
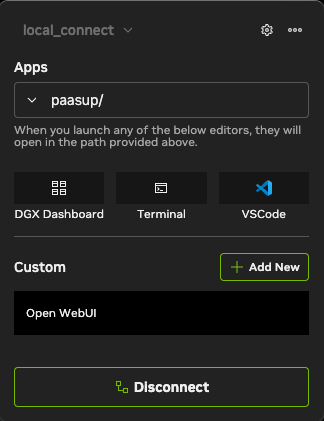
2) Easy Launch via NVIDIA Sync (Custom Script)
Instead of typing terminal commands, we build a one-click execution environment using NVIDIA Sync's Custom feature.
- Check Connection: Ensure NVIDIA Sync is
Connectedto DGX Spark. - Go to Custom Menu: Click the Settings (⚙️) icon in the top right → Click the
Customtab.

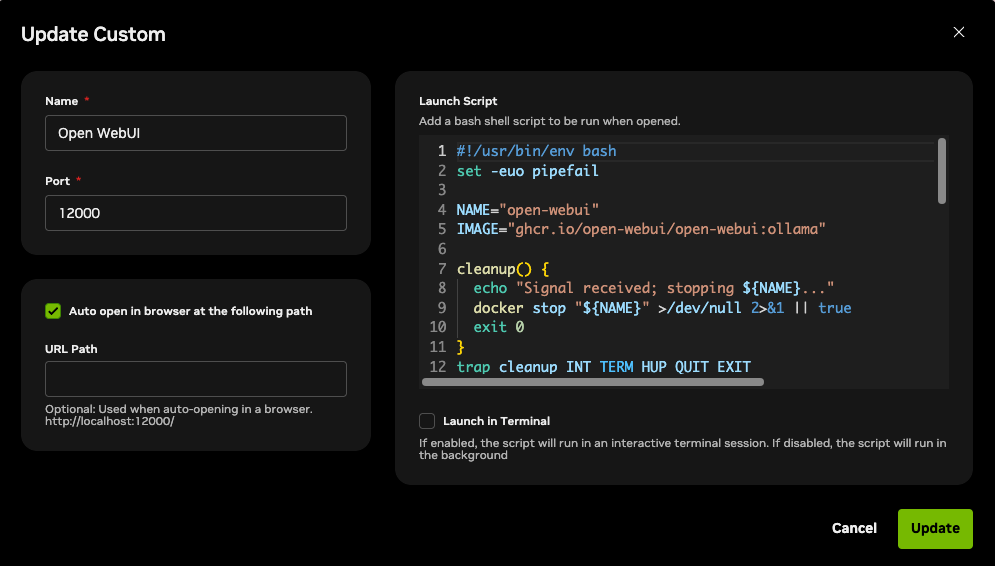
- Click
+Add Newand enter the following details. (We use port12000to avoid conflicts).- Name:
Open WebUI - Port:
12000 - Auto open in browser at the following path: ✅ Checked
- Launch Script: Copy and paste the code below.
- Name:
#!/usr/bin/env bash
set -euo pipefail

NAME="open-webui"
IMAGE="ghcr.io/open-webui/open-webui:ollama"

# Stop container when script exits (Stop button clicked)
cleanup() {
  echo "Signal received; stopping ${NAME}..."
  docker stop "${NAME}" >/dev/null 2>&1 || true
  exit 0
}
trap cleanup INT TERM HUP QUIT EXIT

# Check if Docker daemon is reachable
if ! docker info >/dev/null 2>&1; then
  echo "Error: Docker daemon not reachable." >&2
  exit 1
fi

# Already running?
if [ -n "$(docker ps -q --filter "name=^${NAME}$" --filter "status=running")" ]; then
  echo "Container ${NAME} is already running."
else
  # Exists but stopped? Start it.
  if [ -n "$(docker ps -aq --filter "name=^${NAME}$")" ]; then
    echo "Starting existing container ${NAME}..."
    docker start "${NAME}" >/dev/null
  else
    # Not present: create and start it.
    echo "Creating and starting ${NAME}..."
    docker run -d -p 12000:8080 --gpus=all \
      -v open-webui:/app/backend/data \
      -v open-webui-ollama:/root/.ollama \
      --name "${NAME}" "${IMAGE}" >/dev/null
  fi
fi

echo "Running. Press Ctrl+C to stop ${NAME}."
# Keep the script alive until a signal arrives
while :; do sleep 86400; done
- Click
Add. You will see Open WebUI in the Custom section of the main screen. Clicking it now launches your private AI chatbot and automatically opens the browser (http://localhost:12000).
5. ComfyUI: Automating Stable Diffusion Image Generation
Beyond text, let's utilize the powerful GPU for image and video generation. ComfyUI offers a node-based interface for precise control over Stable Diffusion models.
1) Basic Installation and Data Preparation (Manual)
Download ComfyUI to the host machine and prepare model files. This establishes local data that the Docker container will reference later.
Clone Source Code
Clone the ComfyUI repository to your home directory.
git clone https://github.com/comfyanonymous/ComfyUI.git
cd ComfyUI/
Setup Virtual Environment and PyTorch
Create a venv and install PyTorch for local testing (optional if only using Docker, but recommended for debugging).
# Create and activate venv
python3 -m venv comfyui-env
source comfyui-env/bin/activate

# Install PyTorch (Supporting CUDA 12.9)
pip3 install torch torchvision --index-url https://download.pytorch.org/whl/cu130
Install Dependencies
pip install -r requirements.txt
Download Model (Checkpoint)
Download the Stable Diffusion 1.5 model (approx 2GB) for testing.
cd models/checkpoints/
wget https://huggingface.co/Comfy-Org/stable-diffusion-v1-5-archive/resolve/main/v1-5-pruned-emaonly-fp16.safetensors
cd ../../
Local Test Run
Start the server to confirm it works.
python main.py --listen 0.0.0.0
Check your browser at http://<DGX_SPARK_IP>:8188.
After checking: Press
Ctrl+Cto stop the server (crucial to avoid port conflicts).
2) Automating with NVIDIA Sync (Custom Script)
We will run ComfyUI stably on top of an NVIDIA-optimized PyTorch container.
- Prepare Docker Image: Pull the optimized PyTorch image from NVIDIA NGC.
docker pull nvcr.io/nvidia/pytorch:25.11-py3
- Register Script: In NVIDIA Sync Custom tab, click
+Add New:- Name:
ComfyUI - Port:
8188 - Auto open in browser: ✅ Checked
- Launch Script: Copy the code below. This script mounts the local folder and modifies
requirements.txtto avoid overwriting NVIDIA's optimized libraries. (EnsureLOCAL_COMFY_DIRmatches your path).
- Name:
#!/usr/bin/env bash
set -euo pipefail

# --- Variables ---
NAME="comfyui-server"
IMAGE="nvcr.io/nvidia/pytorch:25.11-py3"
# Path to local ComfyUI
LOCAL_COMFY_DIR="$HOME/ComfyUI"

# --- Cleanup Function ---
cleanup() {
    echo "Signal received; stopping ${NAME}..."
    docker stop "${NAME}" >/dev/null 2>&1 || true
    exit 0
}
trap cleanup INT TERM HUP QUIT EXIT

# Check Docker Daemon
if ! docker info >/dev/null 2>&1; then
    echo "Error: Docker daemon not reachable." >&2
    exit 1
fi

# Handle existing containers
if [ -n "$(docker ps -aq --filter "name=^${NAME}$")" ]; then
    if [ -n "$(docker ps -q --filter "name=^${NAME}$" --filter "status=running")" ]; then
        echo "Container ${NAME} is already running."
        while :; do sleep 86400; done
        exit 0
    else
        echo "Removing stopped container..."
        docker rm "${NAME}" >/dev/null
    fi
fi

echo "Creating and starting ${NAME}..."

# --- Run Container ---
# -v: Mount local files to container (Persist data)
docker run -d \
  --name "${NAME}" \
  --gpus all \
  --network host \
  --ipc=host \
  -v "${LOCAL_COMFY_DIR}:/workspace/ComfyUI" \
  "${IMAGE}" \
  bash -c '
    echo "Checking GPU visibility..."
    nvidia-smi

    cd /workspace/ComfyUI

    echo "Processing requirements.txt..."
    # 1. Copy requirements to a safe location
    cp requirements.txt /tmp/req_safe.txt

    # 2. Remove torch packages from requirements to protect
    #    NVIDIA optimized PyTorch image
    sed -i "/^torch$/d" /tmp/req_safe.txt
    sed -i "/^torchvision$/d" /tmp/req_safe.txt
    sed -i "/^torchaudio$/d" /tmp/req_safe.txt

    # 3. Install remaining dependencies
    echo "Installing dependencies from file..."
    pip install -r /tmp/req_safe.txt > /tmp/install_logs.txt 2>&1
    # Supplement audio packages
    pip install torchaudio --no-deps > /tmp/audio_install_log.txt 2>&1

    echo "Starting ComfyUI..."
    python main.py --listen 0.0.0.0 --port 8188
  ' >/dev/null

echo "ComfyUI is starting via NVIDIA Sync."
echo "Running. Press Stop in Sync to end."

while :; do sleep 86400; done
- Click
Add. The ComfyUI item is created.
- One click now opens ComfyUI. Generated images are saved safely to your local folder (
~/ComfyUI/output) even if the container is stopped.
6. TensorRT-LLM: Enterprise-Grade LLM Serving
Finally, let's serve a massive model like gpt-oss:120b using TensorRT-LLM to fully utilize the DGX Spark.
1) Environment Prep and Verification
This is a heavy task, so prerequisites are essential.
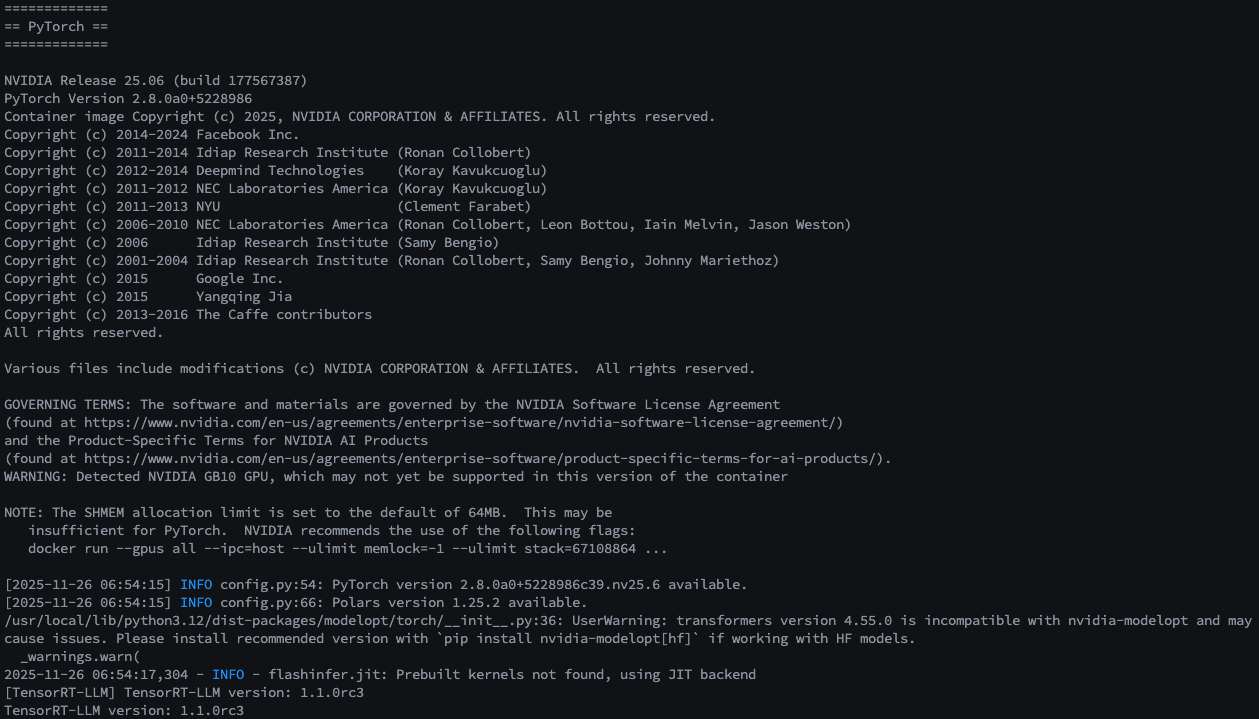
Check Prerequisites: Ensure GPU is recognized inside Docker.
# Check Driver
nvidia-smi

# Check Docker GPU Runtime
docker run --rm --gpus all nvcr.io/nvidia/tensorrt-llm/release:spark-single-gpu-dev nvidia-smi
Verify Library: Test if Python libraries load correctly.
docker run --rm -it --gpus all \
  nvcr.io/nvidia/tensorrt-llm/release:spark-single-gpu-dev \
  python -c "import tensorrt_llm; print(f'TensorRT-LLM version: {tensorrt_llm.__version__}')"
- Expected:
TensorRT-LLM version: 1.1.0rc3or similar.
2) Model Download (Manual)
You will download the model data (approx. 180~190GB). Ensure a stable connection.
Set HuggingFace Token:
export HF_TOKEN=<your-huggingface-token>
Download and Test Generation: Run quickstart_advanced.py to download and complete a simple sentence.
export MODEL_HANDLE="openai/gpt-oss-120b"

docker run \
  -e MODEL_HANDLE=$MODEL_HANDLE \
  -e HF_TOKEN=$HF_TOKEN \
  -v $HOME/.cache/huggingface/:/root/.cache/huggingface/ \
  --rm -it --ulimit memlock=-1 --ulimit stack=67108864 \
  --gpus=all --ipc=host --network host \
  nvcr.io/nvidia/tensorrt-llm/release:spark-single-gpu-dev \
  bash -c '
    # Download Tiktoken files (Required)
    export TIKTOKEN_ENCODINGS_BASE="/tmp/harmony-reqs" && \
    mkdir -p $TIKTOKEN_ENCODINGS_BASE && \
    wget -P $TIKTOKEN_ENCODINGS_BASE https://openaipublic.blob.core.windows.net/encodings/o200k_base.tiktoken && \
    wget -P $TIKTOKEN_ENCODINGS_BASE https://openaipublic.blob.core.windows.net/encodings/cl100k_base.tiktoken && \

    # Download Model
    hf download $MODEL_HANDLE && \

    # Inference Test
    python examples/llm-api/quickstart_advanced.py \
      --model_dir $MODEL_HANDLE \
      --prompt "Paris is great because" \
      --max_tokens 64
    '

If the sentence is generated, the model is ready.
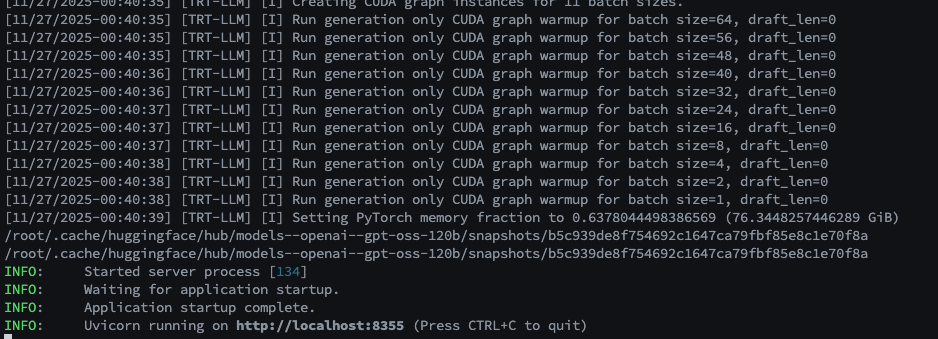
3) (Optional) API Server Test (trtllm-serve)
Launch this model as an OpenAI-compatible API Server.
export MODEL_HANDLE="openai/gpt-oss-120b"

docker run --name trtllm_llm_server --rm -it --gpus all --ipc host --network host \
  -e HF_TOKEN="" \
  -e MODEL_HANDLE="$MODEL_HANDLE" \
  -e HF_HUB_OFFLINE=1 \
  -v $HOME/.cache/huggingface/:/root/.cache/huggingface/ \
  nvcr.io/nvidia/tensorrt-llm/release:spark-single-gpu-dev \
  bash -c '
    export TIKTOKEN_ENCODINGS_BASE="/tmp/harmony-reqs" && \
    mkdir -p $TIKTOKEN_ENCODINGS_BASE && \
    wget -P $TIKTOKEN_ENCODINGS_BASE https://openaipublic.blob.core.windows.net/encodings/o200k_base.tiktoken && \
    wget -P $TIKTOKEN_ENCODINGS_BASE https://openaipublic.blob.core.windows.net/encodings/cl100k_base.tiktoken && \
    # Create memory optimization config
    cat > /tmp/extra-llm-api-config.yml <<EOF
print_iter_log: false
kv_cache_config:
  dtype: "auto"
  free_gpu_memory_fraction: 0.9
cuda_graph_config:
  enable_padding: true
disable_overlap_scheduler: true
EOF
    # Start Server (Port 8355)
    trtllm-serve "$MODEL_HANDLE" \
      --max_batch_size 64 \
      --trust_remote_code \
      --port 8355 \
      --extra_llm_api_options /tmp/extra-llm-api-config.yml
  '
Logs will appear upon success.
Test via curl in a separate terminal:
curl -s http://localhost:8355/v1/chat/completions \
  -H "Content-Type: application/json" \
  -d '{
    "model": "openai/gpt-oss-120b",
    "messages": [{"role": "user", "content": "Paris is great because"}],
    "max_tokens": 64
  }'

Stop with Ctrl+C and proceed.
4) Service Deployment via NVIDIA Sync (Custom Script)
Register Script: Add New Custom in NVIDIA Sync.
- Name:
GPT-OSS 120B - Port:
8355 - Auto open in browser: ⬜ Unchecked
- Launch Script: Use the script below. It runs in 'Offline Mode' using the cached model.
#!/usr/bin/env bash
set -euo pipefail

# --- Variables ---
NAME="trtllm-gpt-oss-120b"
IMAGE="nvcr.io/nvidia/tensorrt-llm/release:spark-single-gpu-dev"
MODEL_HANDLE="openai/gpt-oss-120b"
# Token empty as we are offline
MY_HF_TOKEN=""

cleanup() {
    echo "Signal received; stopping ${NAME}..."
    docker stop "${NAME}" >/dev/null 2>&1 || true
    exit 0
}
trap cleanup INT TERM HUP QUIT EXIT

# Check Docker
if ! docker info >/dev/null 2>&1; then
    echo "Error: Docker daemon not reachable." >&2
    exit 1
fi

# Reset existing container
if [ -n "$(docker ps -aq --filter "name=^${NAME}$")" ]; then
    echo "Removing old container to apply latest settings..."
    docker stop "${NAME}" >/dev/null 2>&1 || true
    docker rm "${NAME}" >/dev/null 2>&1 || true
fi

echo "Creating and starting ${NAME}..."

# --- Run Container ---
docker run -d \
  --name "${NAME}" \
  --gpus all \
  --network host \
  --ipc=host \
  --ulimit memlock=-1 --ulimit stack=67108864 \
  -e HF_TOKEN="${MY_HF_TOKEN}" \
  -e MODEL_HANDLE="${MODEL_HANDLE}" \
  -e HF_HUB_OFFLINE=1 \
  -v $HOME/.cache/huggingface/:/root/.cache/huggingface/ \
  "${IMAGE}" \
  bash -c '
    # Download Tiktoken
    export TIKTOKEN_ENCODINGS_BASE="/tmp/harmony-reqs" && \
    mkdir -p $TIKTOKEN_ENCODINGS_BASE && \
    wget -P $TIKTOKEN_ENCODINGS_BASE https://openaipublic.blob.core.windows.net/encodings/o200k_base.tiktoken && \
    wget -P $TIKTOKEN_ENCODINGS_BASE https://openaipublic.blob.core.windows.net/encodings/cl100k_base.tiktoken && \

    # Performance Optimization Config
    cat > /tmp/extra-llm-api-config.yml <<EOF
print_iter_log: false
kv_cache_config:
 dtype: "auto"
 free_gpu_memory_fraction: 0.95
cuda_graph_config:
 enable_padding: true
disable_overlap_scheduler: true
EOF
    echo "Starting TRT-LLM Serve..."

    trtllm-serve "$MODEL_HANDLE" \
    --host 0.0.0.0 \
    --port 8355 \
    --max_batch_size 8 \
    --max_num_tokens 32768 \
    --trust_remote_code \
    --extra_llm_api_options /tmp/extra-llm-api-config.yml
  ' >/dev/null

echo "Running TRT-LLM via NVIDIA Sync."
echo "Wait for model loading... Check logs with: docker logs -f ${NAME}"
echo "Running. Press Stop in Sync to end."

while :; do sleep 86400; done
Note: OOM Issues & Loading Time
- Loading Time: The 120B model is huge. It may take several minutes before the API responds.
- Memory (OOM): If you see "Out of memory" in the logs (
docker logs -f trtllm-gpt-oss-120b), adjust parameters in the script above:--max_batch_size: Reduce (e.g., 8 → 4 or 2)--max_num_tokens: Reduce (e.g., 32768 → 16384)free_gpu_memory_fraction: Adjust (e.g., 0.95 → 0.90)
Click GPT-OSS 120B in NVIDIA Sync to start.

5) Practical Use: Coding Assistant & Documentation
Connect the API Server (http://localhost:8355/v1) to external tools.
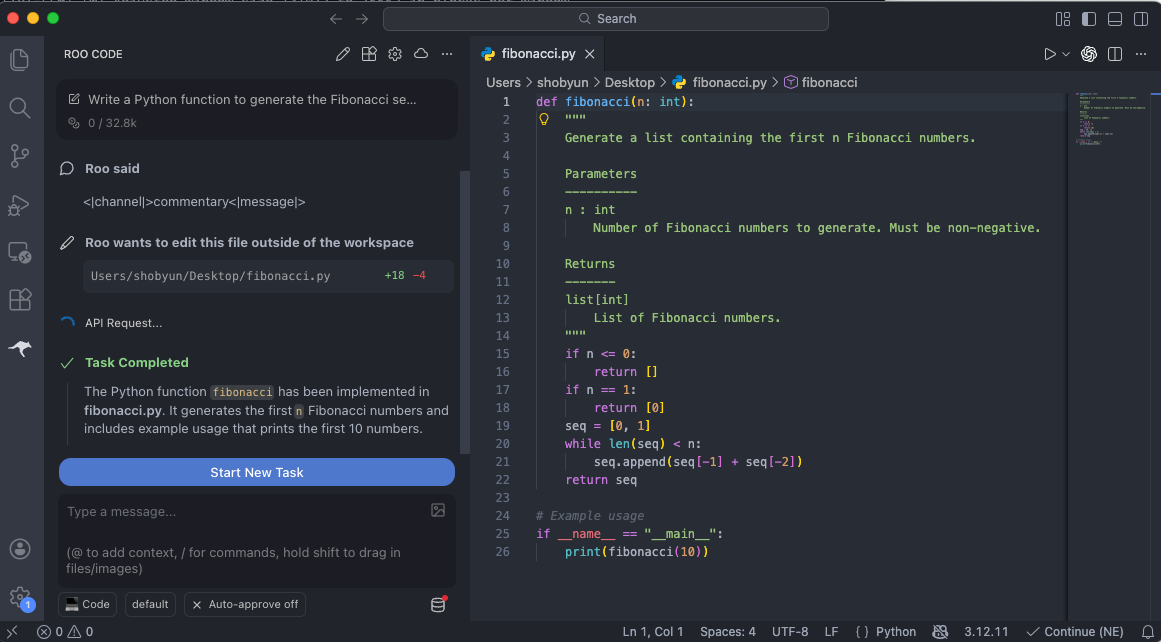
Example 1. VS Code: Roo Code (AI Coding Assistant)
In 'Roo Code' settings Providers tab:
- API Provider:
OpenAI Compatible - Base URL:
http://localhost:8355/v1 - API Key:
sk-dummy(Any string works) - Model:
openai/gpt-oss-120b - Context Window:
32768(Match script setting)
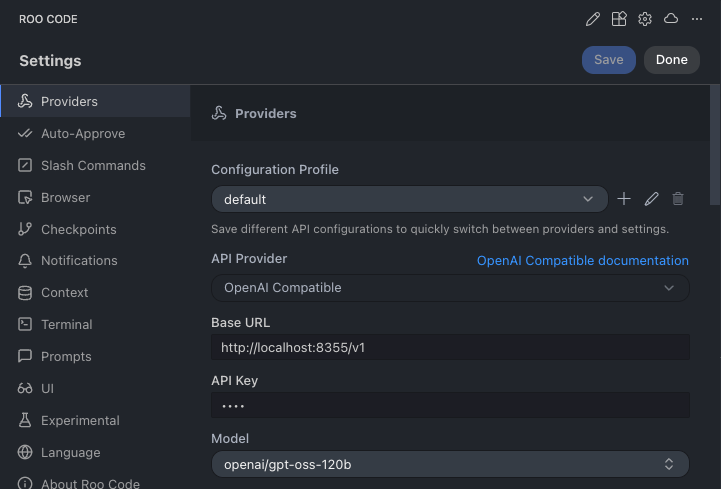

Now use it as a coding assistant.
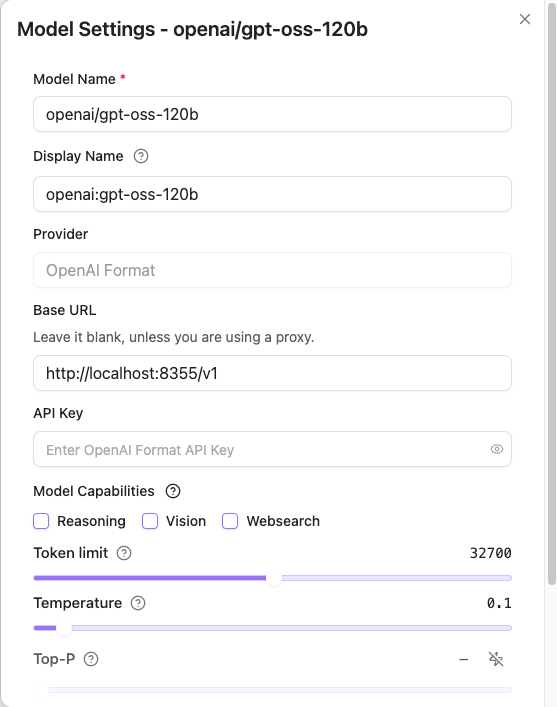
Example 2. Obsidian: Copilot (Knowledge Management)
In Obsidian Copilot Plugin settings Model tab, click + Add Model:
- Model Name:
openai/gpt-oss-120b - Provider:
OpenAI Format - Base URL:
http://localhost:8355/v1 - Advanced: Check
CORS
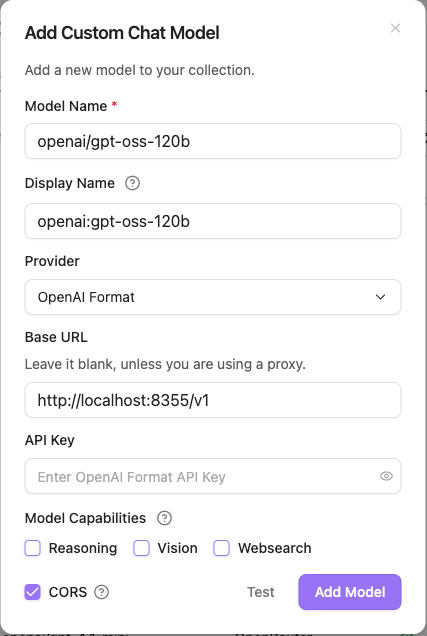
After adding, click Edit on the model and set Token limit to 32768.
Securely entrust your notes to AI without data leakage concerns. !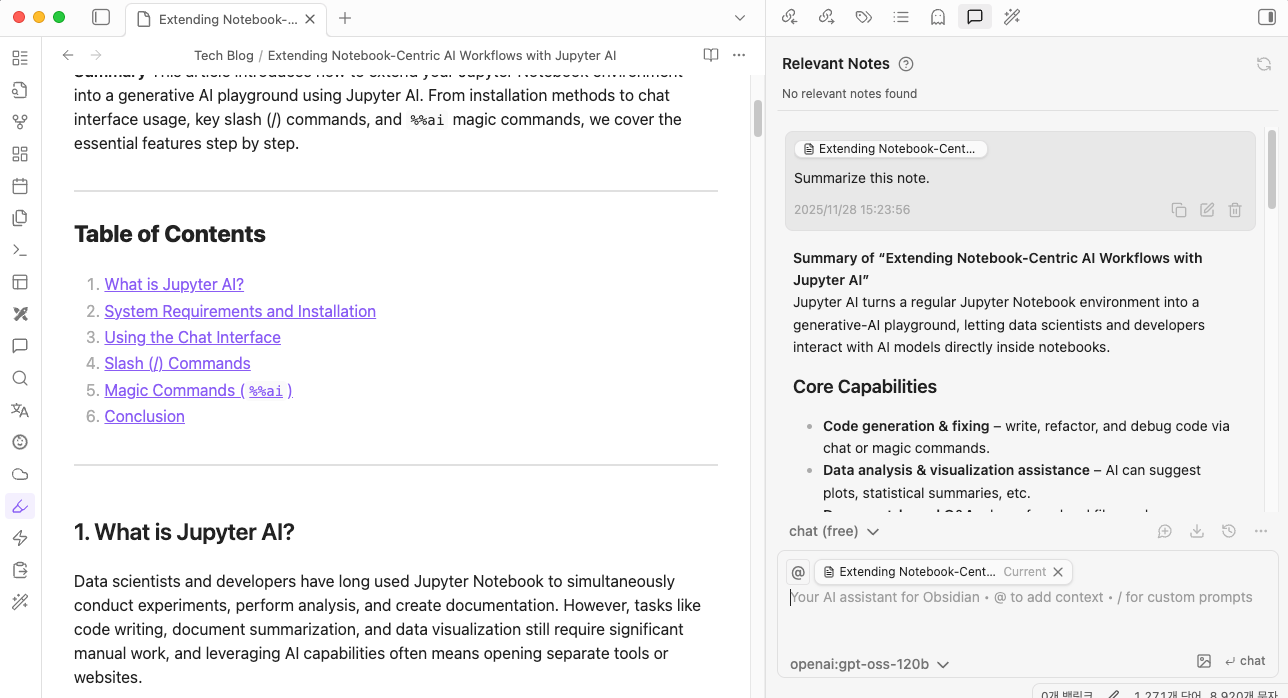
7. Conclusion: Completing Your Private AI Cloud
Your DGX Spark has evolved from a high-performance workstation into a Private AI Cloud accessible from anywhere.
We have built:
- Seamless Connectivity: Secure access via Tailscale.
- Easy Management: One-click service control via NVIDIA Sync Custom Scripts.
- Diverse Workloads:
- OpenWebUI: Chatbot for daily tasks.
- ComfyUI: Creative image generation studio.
- TensorRT-LLM: Enterprise-grade LLM for coding and docs.
For more on RAG or AI Agents, check the NVIDIA Spark Playbooks and continue expanding your workflow.